A quick video about Wildersport Outdoors, what we are all about, and the unboxing of a pretty cool new wood gasifier backpacking stove.

The OFFICIAL blog of Wildersport Outdoors, and Outdoor Dave. Tips, tricks, and advice on all things related to sporting in the wilderness! Camping, Paddle Sport, Hiking, Hunting, Fishing, Geocaching, Off Roading, Mountain Biking and more! (Copyright 2007 - 2014 Wildersport Outdoors Inc. League City, Texas U.S.A. All rights reserved.)
Friday, April 7, 2017
Mr. Heater Portable Buddy pilot fox.
So our mr. Heater portable buddy that we use camping fishing in the shop pretty much everywhere finally decided that the pilot wasn't going to work we did a little research and found the fix here it is to share with you.
Reliable camp lighting.
We've been through many interations of camp lighting over the years, The experiments were
- Propane lanterns
- Flashlights
- Mag lights in lantern mode
- Headlamps
- kerosene lanterns
- White gas / Gasoline lanterns
- Butane lanterns.
- Candle lanterns
- and most recently. The Tac Light lantern. Those super bright LED lanterns.
All of them have their advantages, and disadvantages. And just like the liquid fueled / gasoline / white gas stoves, we come back to white gas / gasoline every time.
Simply put, While the tac light lantern is a good lantern, there are many imitators, and the light, well, it's too stinking bright close up to be anything but blinding, but does not disperse well enough to make a good area light.
Propane has proved over the years to be expensive to use with any frequency, especially with the fuel consumption that we deal with in propane lanterns.
Kerosene works well, but produces too limited of a light be to useful beyond a small camp kitchen, or a tent / cabin room. And considering the fuel isn't used on anything we own other than the lantern, it is a bit hard to give serious consideration to use... Having said that, if I could re jet the stove to use Kerosene, it would be a GREAT option for international travel. And with a stove like the MSR XGK you can do just that. Kerosene is readily available pretty much anywhere so you would never need to worry about fuel but...
As we prep our gear for the spring camping season that is almost upon us here in Texas, we are getting the gas lanterns ready White gas is hard to find outside of the US and Canada, but unleaded gasoline is readily available. SO a dual fuel model makes for great fuel availability.
Our prep work as you might recall includes testing for leakage, and doing a pre burn at home to insure that the lantern lights and operates. We have two of them, one of which had a failed pump seal that was easily replaced with parts from our local big box retailers sporting goods section, and it simply took a few starts to clear the cobwebs out.
It should be mentioned that we stocked up on fuel a long time ago, thinking white gas would go through fairly quickly. We did not find that to be true.
In real world use, we would burn up 2 1lb propane cylinders in a 24 hour period in the lantern. We could fill up the white gas lantern 8 times with a 1 gallon can, and each fill up lasted for 2 days.
The results in fuel usage are similar with the stove. Have we made our point clearly enough on why we chose gasoline / white gas over propane yet?
So now that the lanterns are ready to go and stuffed back in their cases, we await delivery of our replacement packings for the stove, and we get that leak fixed, and we are ready to go.
Saturday, March 11, 2017
Pre-trip prep things to check on your camping appliances.
Something not often covered but far too often discovered while at camp is that your appliances have some sort of issue.
You are most likely issue is going to be a leak of some sort. You should know how to detect and possibly fix those leaks.
With liquid-fueled appliances leaks tend to be readily apparent. On stoves you typically see fuel pooling up in the little recess where the pickup tube comes out of the tank. Or the tank simply will not take pressure due to either a bad pump or a bad cap.
If you see fuel pooling chances are you will likely be able to see where it is coming from. The most likely culprit is the packing behind the valve stem nut this is a piece of graphite that does tend to go bad over time. To fix this you can try to turn the valve wide open and then using 1/2 inch open end wrench simply snug the nut down a little at a time no more than 1/8 turn.
If it is a bad cap he will smell fuel leaking from around the cap and quite possibly see fuel leaking down the tank near the fill cap The fix there is to Simply replace the cap.
A bad pump is usually do to the leather cup getting dried out and shrinking you can try rehydrating and swelling that cup by removing the pump and soaking the leather cup in vegetable oil for about an hour or so. Then reinstall the pump and try generating pressure in the tank. If that fails a new pump repair kit is in order they are inexpensive and readily available get many retailers.
Propane and butane offer a unique problem. Since we are addressing car camping in this post I'm not going to go into the issues of butane as it is a very Cod fuel to use for out of the car camping and more commonly used for backpacking.
Determining where or even if propane is leaking can be far more complex then determining if liquid fuel is leaking and it requires additional equipment to run a test. You will need a household spray bottle filled with soapy dishwater the idea here is to spray around any and all joints and fittings where the propane runs if the propane is leaking the soapy water should bubble up so make sure you use enough soap and that it is the kind that gets very sudsy.
To run the test make certain you are outdoors and no where near any sort of ignition source then simply attach your fuel bottle or line to your Appliance and spray down the joints where the bottle screws in where the valve that operates the fuel flow is and look for any bubbles. Open the valve slowly and continue the test spraying around the valve until the valve is all the way open and then close the valve make sure you don't see any bubbles other than what you expect to see was just soapy water.
Depending on the manufacturer and the model of the propane Appliance in question you will likely need to Source up whenever components you find leaking if they are available. We have found with Coleman, Zodi and Century appliances that Parts availability tends to be fairly good. Other brands can be hit-or-miss. Sometimes all you need to replace is a simple rubber or cork gasket comma sometimes it's an entire valve assembly or even a regulator. This is just part and parcel of taking care of your equipment.
It should be noted that with proper care there is no shortage of late 1940s and early 1950s camp stoves that have been cared for and lovingly used by generations of the same family. The build quality today is no better or worse than has been in years past thankfully. With appropriate care and maintenance you can expect you're Camp appliances to provide great service literally for decades.
It should be noted then we our cells have had to replace a valve stem packing on our Coleman 424 stove and a pump rebuild kit on one of our premium fuel lanterns. We also have a leaking fuel control valve on a Century single burner camp stove that we got in the 1980s. We are not planning on fixing that particular stove since the replacement part cost more than the stove.
Hopefully the information we've provided here today has been of some value to you. Before you fully rely on this information we encourage you to seek out Diagnostic and repair information from your specific Appliance vendor. They can be very good at helping keep your equipment running in top condition with maximum safety.
Somero you've got the information hopefully you've taken care of your equipment so get out there and find your own Road Less Traveled.
Wednesday, March 8, 2017
Setting up your camp kitchen part 3. Selecting a camp stove,
So you want to actually cook, not just grill or stick hot dogs on a stick over a camp fire for a weekend of camping. You are going to need a stove for that.
You have decided you are going ot do out of the car camping. So ultra light single burner butane stoves probably aren't for you either...
Nope, you need a good 2 burner camp stove. But there are so many options out there. Let's compare the main types side by side and give you the options, and a bit of a story behind why we prefer one over the other.
When it comes to full size camp stoves, 2 burner jobs, there are 2 main types. Liquid fuel, and propane. Yes there are other compressed gas types but propane and liquid fuel are the MAIN types you are going to run into here..
Each type of stove has its advantages, and disadvantages, let's run down the list...
Advantages.
Liquid Fuel:
- Reliability.
- Environmentally friendly fuel consumption.
- No waste cartridges.
- If using unleaded gasoline, fuel is available pretty much everywhere
- Parts readily available to repair if needed. Little down time.
- Performance does not reduce in cold weather.
- Impress your family, friends, and fellow campers with an almost steam punk sort of retro tech.
- Fuel readily available if using unleaded gasoline, when travelling outside of the continental U.S. You might not be able to source up, or carry your own propane accross the borders...
Propane:
- Lower initial cost.
- Easier to use / more intuitive use.
- More compact overall dimensions for similar cooking capacities.
- Greater number of options of manufacturers and models. Including some Stainless Steel models.
Disadvantages:
Liquid Fuel:
- Higher initial cost. As of March 8 2017, on amazon.com, the Coleman Guide series dual fuel stove currently retails at Amazon for $89.36 The Coleman "Classic" 2 burner propane stove retails for $42.95, so the liquid fuel model retails for just over double the propane appliance cost.
- Coleman branded Fuel, as it is called, can be hard to come by in gallon cans at certain giant international retailers, and the cost is typically. There is another national brand they seem to carry called Crown Camp Fuel in the gallon cans. I can not attest to the quality of Crown, but have used Walmart's own house branded Ozark Trail Camp Fuel for years. (No longer available). I suspect that is / was Crown in a different can.
- More complex fueling / lighting procedure. Not a big deal once you get used to it, but if all you ever used camp appliance wise is propane / butane appliances, liquid fuel is going to come as a shock.
- Fuel spills into clothing leave a stink, and can irritate skin. PLUS if you spill camp fuel on yourself, you will want to steer clear of the camp fire!
Propane:
- Lower reliability. I have had to replace pressure regulators on one camp stove 3 times in 2 years due to leaks.
- Sensitive to canister pressure, many stoves will only work with 1lb canisters, using them with a tee off of a 20lb tank for example can damage your regulator (the first one that broke!).
- The seals tend to dry out, and unlike liquid fuel stove seals don't respond well to soaking in vegetable oil.
- 1lb propane canisters, even when no more fuel is escaping, contain enough potential energy to explode violently if heated. Many jurisdictions consider them hazardous waste making them difficult to dispose of properly.
- Propane functions off of the pressure difference between the tank and the outside air. At lower elevations and at sub freezing temps, the pressure differential can be zero, meaning the propane will stay in the cylinder. A liquid fuel stove would simply require a few more strokes of the pump to generate that pressure difference.
- Considerably higher total cost of fuel when used semi, to frequently. A gallon of camp fuel, typically is equivalent to if I recall correctly 8.5 1lb propane cylinders.
There is some debate among owners, and Coleman themselves states that their fuel only lasts a maximum of 7 years in proper storage, but to be honest. I think their numbers might be conservative as there is plenty of anecdotal evidence that people are using 20 + year old Coleman fuel and similar white gas fuels with no ill effect on their appliances.
Long story short, use your own decision making power. For me, the lower total cost of ownership, combined with fuel availability internationally in the form of regular unleaded if need be, and the easy as pie reliability of a dual fuel / liquid fuel stove vastly outweighs the ease of use, and lower initial cost of propane appliances. Your needs and desires may vary.
Not saying we don't own a propane stove. We do, but it is used for very limited applications where a liquid fuel stove won't be appropriate. I.E. the propnae stove is a Brinkmann stainless steel stove, that is great for beach cookouts where sand, salt, and wet air are the order of the day. but aside from that, it's liquid fuel for us all the way!
Setting up your camp kitchen, part 2. The morning cup of coffee.
Continued from Setting up your camp kitchen, part 1.
As you continue setting up your camp kitchen, there are must haves, and nice to haves, and what was I thinking items. Depending on your sensibilities, the definition of must have can be pretty broad, so with that said, let's dive in and talk about the gear.
I should mention that where possible, I WILL steer you away from anything that touches your food or beverage when hot that includes either plastics, or aluminum. The health concerns of both of those materials are well documented and long standing. I do have safety / durability concerns with glass as well, but will select glass over plastic almost every single time. In a later post we will discuss glass food storage containers.
#7. Coffee making equipment. No morning for me is quite complete without a good cup of coffee. When I first started out of the car camping, I would boil water in the regular cook pot, and dunk a Folgers Coffee single into a mug and steep it like a tea bag. The results were barely adequate at best, and honestly, I think cowboy coffee where you use your teeth to filter out the grounds provided better results. Through many years of trial and error, I have found 2 solutions that work well, but may or may not be your cup of... well not tea in this case...
The first solution I tried that gave marginally acceptable results, was a Texsport stainless steel percolator. This is probably the most popular method for brewing coffee until the 1970s when the automatic drip coffee maker rose in popularity, but for most people, taking your Mr. Coffee tot he camp site was beyond unreasonable, so for camping, many of us, myself included, suffered through with percolator brewed coffee on camping trips. The flavor certainly is much better than the coffee singles approach, but once you get to drip brewed coffee, percolated coffee is, well... bitter. I don't mean to badmouth percolator brewed coffee, it's just not my favorite, HOWEVER, a percolator is super reliable, and even if your camp stove fails, you can brew percolated coffee on a camp fire which is an extra special experience.
In the 1970s, particularly the late 1970s, drip brewed coffee has been the norm for almost all coffee, except for when camping. I do not recall exactly when I first saw one, but in 2006 I discovered for myself the joys of owning a camping drip coffee maker that runs off of your camp stove. The Coleman Camping Coffee maker. It is almost a normal drip coffee maker, except the heat source used is from your camp stove, either propane or liquid fuel. It is designed to be used on the Coleman 2 burner camp stoves, but works on similar stoves, and I have seen it used in RVs, boats, and residential applications where there is a gas stove. My home brewer is a Ninja Coffee Bar, and while the results aren't as fancy, the quality is quite good from the Coleman, and the brew time is acceptable, On par with the old Black and Decker coffee maker I wore out. My only complaint is that the glass carafe always leaves me scared I am going to drop and break it far away from a source of replacements.
Fast forward to late 2016 when I learned about a stainless steel replacement carafe for Coleman's fancier propane fueled stand alone Quickpot coffee maker. It would appear the carafe is the same between the two. So my latest iteration of the coffee maker is the Coleman Camping Coffee Maker fitted with a Quickpot stainless steel carafe. This eliminates my terror of being coffee less on a camping trip. The remaining item I need to add to my coffee rig is a permanent filter to take the place of paper filters. I want to do what I can to reduce waste and excess use.
There is also the Melida Cone filter brewer. A simple funnel shaped to hold a coffee filter, and brew your coffee one cup at a time. I used one of these as my first home coffee maker when I got my first apartment when I moved out of my parents place. It works, reasonably well, doesn't use much space, and has the advantage of making you brew a fresh cup of coffee every time. It's not like you are going to be able to brew an entire pot at once. I guess you could, but it's not going to stay hot...
Another method for brewing coffee in camp is a French press, again for durability sake, I strongly advise if you do go this method, get and use a Stainless Steel model.
Lastly, if you are like me, and you love a hot mocha, or a good approximation of a cappuccino then a milk frother is a msut. Just like the carafe, the french press etc... you are going to want to have a stainless steel frother. One thing I found was in a clean protein shake shaker, milk froths up VERY nicely if you don't fill it up more than 1/4.
Of course you will need your supplies. For that I use old / reused 1lb plastic coffee cans. You will want filters, or your favorite permanent filter, coffee grounds, sweetener of your choice, milk, creamer, or even almond milk, and any add ins you would like such as chocolate or caramel syrup, whipped cream etc...
Now picture if you will, you get up before your spouse, go start up the stove, brew a pot Mexican Chocolate flavored coffee (It's a thing, if you can find it, do yourself a favor and try it!), froth the milk, and...
In a 20oz stainless steel vacuum tumbler add.
5 packets sweet and low.
4 oz skim milk, frothed.
1 oz sugar free chocolate syrup
Fill to 7/8 mark with coffee and stir.
Finish off with whipped cream and drizzle a few stripes of chocolate syrup.
See if you can get that into the tent to your spouse before you start drinking it!
Probably better make 2 at the same time to avoid that issue...
So while you are considering the coffee options, remember...
Get out there and find your own... road less traveled.
Amazon links to the equipment and supplies from this post. The coffee and sugar free chocolate syrup are not the lowest prices, but can be hard to find.
Friday, February 24, 2017
A quick word about the Amazon links used in our blog.
I have had a couple of people message me about the Amazon links on the blog, and the ads shown in the Youtube videos for this and the Daves Workshop blog / channel. Here's the scoop.
It takes time, energy, some but not much skill and financial resources to produce the content I am putting out here. To offset this and generate a positive financial standing so that we can keep producing content, and given enough of a positive result, produce more and higher quality content, we have decided to use Affiliate marketing links and display ads
We would greatly appreciate your using our Amazon Affiliate links, as well as liking and subscribing to our Youtube channels. These things really do help keep us motivated, and heading the right direction.
At the time we post up Amazon links, you can be sure that the prices posted are the lowest prices we could find.
It is our intent to find you the best deals we can with the resources we have,
In the months to come, we will likely be looking for additional opportunities to make this effort more self sustaining. We look forward to your support.
And for those of you that have already been supporting us through the Amazon affiliates, youtube advertising and other outlets, we would like to take this opportunity to thank you very much. Your support means the world to us.
Camping considerations for the heavy / obese camper, gear for the coffee lover.
Part of the reason behind our working this Wildersport Outdoors thing, is to use our love for the outdoors and outdoor adventures to get out, and get more active. Basically sneak in workouts without them being drudgery. And we have found in past experience, when we go camping, our diet improves greatly, and our activity level goes way up.
We both love camping, however as larger people, we have some issues with regular camping gear that cause certain concerns / considerations.
Any of you that have shared an airbed with your sleeping partner knows what happens when one of you rolls over, or gets out of bed, and it isn't pretty. So we wanted separate beds that we could scoot together in a sort of makeshift amber king bed. So we went and grabbed a pair of Intex 18" raised twin air beds. Unfortunately one of us is over the 300lb weight rating on the bed. Now the queen size of this same bed is weight rated at 600lbs, and the materials and methods seem to be identical aside from the scale of the mattress itself. So honestly, we are going to wing it.
I am planning on packing the Therm A Rest camp rests with us, in case my air bed fails due to my weight, and hoping praying for the best.
Sleeping bags obviously can be a consideration. Coleman, Slumberjack, and others make King size sleeping bags, the extra room is well worth the extra money. There are so many options and temp ratings I can't really link here.
The Therm A Rest Camp rest self inflating pads we have are over 25 years old, and out of production now. Once we find a suitable replacement I will link them here for your convenience.
We do have an option that would take more packing space, and space in the tent, but we do have Stansport BigXL cots, and with the Therm A Rest they are actually decent to sleep on. Stansport no longer manufactures this model, but it looks like Teton sports makes a similar cot that I will link below.
Honestly I am hoping the airbed will hold up to my weight.
Second issue is probably related, but I don't function well without coffee. Years ago, we bought a Coleman stove top drip coffee maker, which I love, but am always scared to take camping with me because of the glass carafe. Well, while perusing Coleman for parts and accessories, and double checking on Amazon, we found the Coleman Quick Pot Stainless Steel carafe. Basically a direct replacement carafe but in stainless steel instead of glass. SOLD! No chance ever of it breaking.
Now I know, I can use a percolator, and I do own a stainless steel Texport percolator. But have you ever tasted percolator brewed coffee? While it is certainly better than instant, it is far below my standards.
And the last upgrade / replacement we are going for in regards to camping gear is coffee related again. I have gotten a big taste for Hot mochas and cappuccino, Meaning coffee, sweetener, and frothed milk. Sadly our milk frother at home is glass, and VERY fragile glass at that. So instead we are going to go with a Stainless Steel, or Acrylic frother. I typically don't like anything plastic touching foods or drinks if they get hot, but in the case of the frother, the milk stays cold....
So with this stuff in the inventory, and ready to go, it is time to dig down the rest of the gear, I have a park in mind to camp at, with full, nice bathrooms, water, and power as well as a covered picnic table at the sites. So with that knowledge safely tucked away, time to sort out my lists, sort out the gear, and pack accordingly...
Soon you will see some video from the trip we are prepping for, and will get video reviews of the gear in question. But until then... Get out there and find your own... road less traveled.
Monday, January 30, 2017
Setting up your camp kitchen, part 1.
To make your meals, you will want to set up a camp kitchen. Assuming you want to eat something more than reconstituted freeze dried backpacking meals and instant oatmeal, or hot dogs and marshmallows cooked on a stick over a fire, this will take a bit of equipment. We will lay out what we use, what is optional,a nd what is a real msut have. What can be substituted if possible.
- Camp Kitchen. We use the Coleman Pack-A-Way camp kitchen. It is smaller and lighter than several of its competitors, lacking a few of the luxuries the others offer in favor of a more manageable package. If you can rely on say the tailgate of a pickup, or wherever you are camping having a picnic table you can use, you can omit the camp kitchen and use something like the Coleman Stove Utensil rack.
- You will need a washbasin to keep things clean. The Coleman collapsible double wash basin is rugged for plenty of camping trips, and roomy enough to allow you to have a soapy water wash and a rinse basin. They are available in packs just alone or with a nice 4 place enamelware place setting set. (You will of course need dishware right?)
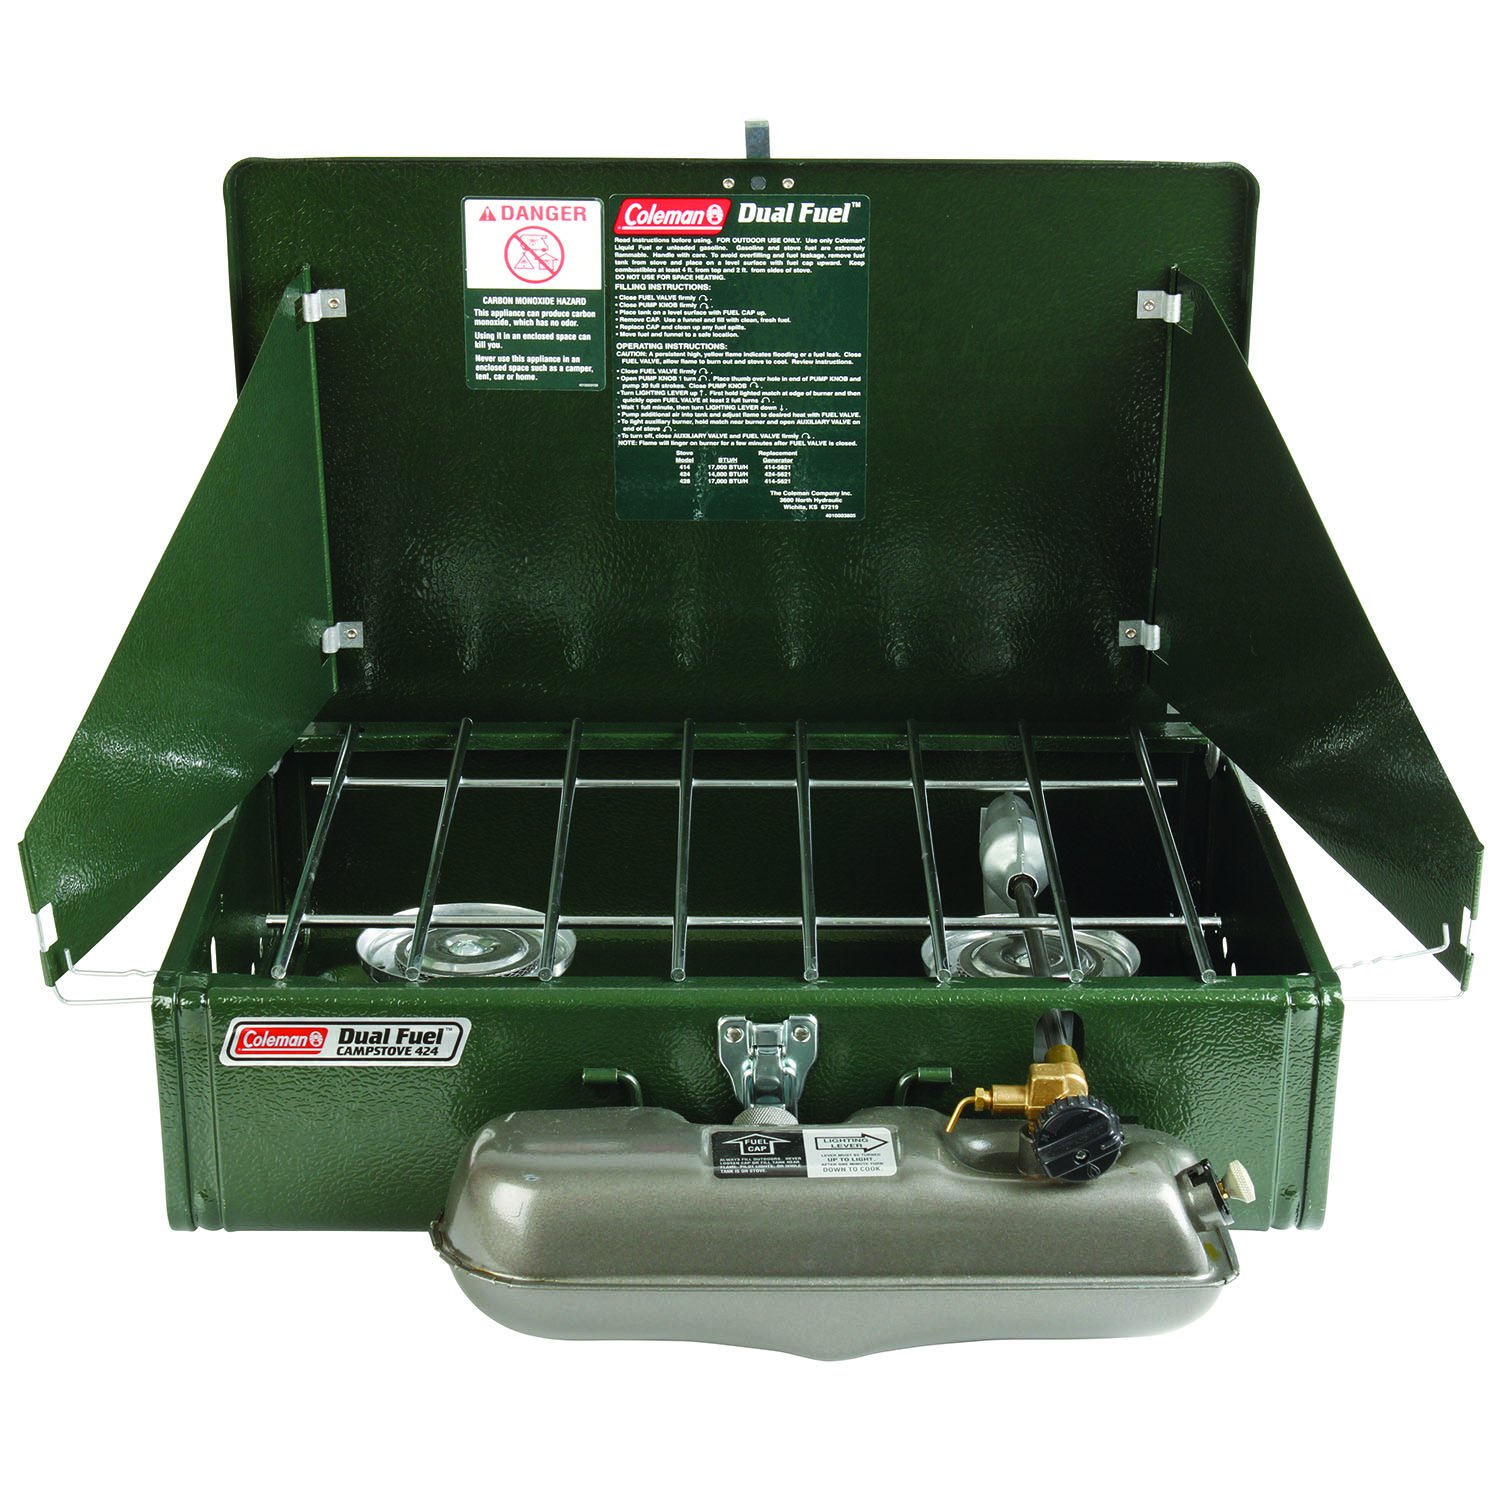
- Of course a camp stove is a must have piece of equipment for your trips. We personally prefer liquid fuel stoves. Specifically the dual fuel stoves. We love the ability to run our stove on the same fuel as our vehicles use. The Coleman 424 Dual Fuel 2 burner camp stove. It uses either Coleman White gas / Ozark Trail Camp Fuel, or unleaded gasoline. Aside from the common fuel, liquid fuels, specifically the White Gas, well a gallon of white gas, or unleaded gasoline has the total full on burn time of 4.5 to 5 of those green 1LB propane cylinders. Make no mistake, a 1LB propane cylinder when used up is still considered hazardous waste, And the cost difference over the long run, a liquid fuel stove pays for itself easily Combine that was the fact that liquid fuels will pressurize and work in conditions that a propane stove simply can not like sub freezing conditions. Something to consider if you are using your stove for winter hunting trips.
- You will of course want cookware. There are a couple of schools of thought to this. Stainless Steel sets with copper bottoms are durable and work well. We have one, an Ozark Trail set that is just a rebadged TexSport, it works great, but has problems with heating evenly. If you want even heating, the only real way to accomplish that is with cast iron cookware. I highly recommend if you are going to buy new cast iron cookware, that you buy non seasoned cookwae. Doing so will teach you how to properly maintain cast iron. You will want a dutch oven, a skillet / fry pan, and a sauce pan. A lid lifter is a life saver as well. A very much optional item, but highly recommended is a griddle. And take our word for it, you want cast iron on that. The reasons are that you can cook LOTS of pancakes, eggs and bacon on a griddle super easy. We love ours.
- Food storage is critical for any sort of home cooking while camping. A quality cooler is a must. Now most of us can't really afford the Yeti type coolers, And the physical size of them compared to the actual storage capacity, they really aren't at least to us, all that appealing. We have found for long weekend camping, a 50 - 60 quart cooler is ideal. The trick is to get one of those "5 day" coolers that will keep block ice, well, ice for 5 days. There are 2 that are our favorites. The Colmean Extreme 50 quart wheeled cooler, and the Igloo MaxCold Roller Cooler 60QT. The main difference, aside from the 10QT diference in capacity, is the physical format, The coleman is more cube shaped, and the wheels are along the "wide side", it rolls much like a suitcase. The Igloo we favor though. It holds ice a little bit better, rolls easier, and the handle is easier to deal with where it is just a simple swing up handle. With either, we simply take empty 1L plastic water bottles, press a little bit of air / water out so that the sides are slightly sucked in and then freeze them solid. We usually use 10 of them. Simply toss them in when you load the cooler, and you are good to go. No soaking wet of the ice on your food containers! I won't provide links, but food storage containers, the plastic or glass ones with air tight lids Square ones use space much better than round ones. Keep everything air, and liquid tight!
- Cutting board, and knives. Another no links. Pick your favorites, just make sure that your knives are kept in a knife roll so that they transport and sstore safely.
There's more to come, but this is going to be a long read. Stick with us and enjoy the list!
Friday, January 27, 2017
Cooking well. Low carb pizzas in camp.
So you are camping enthusiasts like us that need to lose weight. You know getting out in the back country gets you active up and around in beautiful surroundings to the point you are getting a workout in without even noticing it.
All that extra excersize doesn't mean you can eat whatever you want and still expect to lose weight. I know, I tried that route. It doesn't work.
So with the advice of my doctor, and nutritionist, and mind you I am NOT offering up medical advice, just telling you what is working for me.
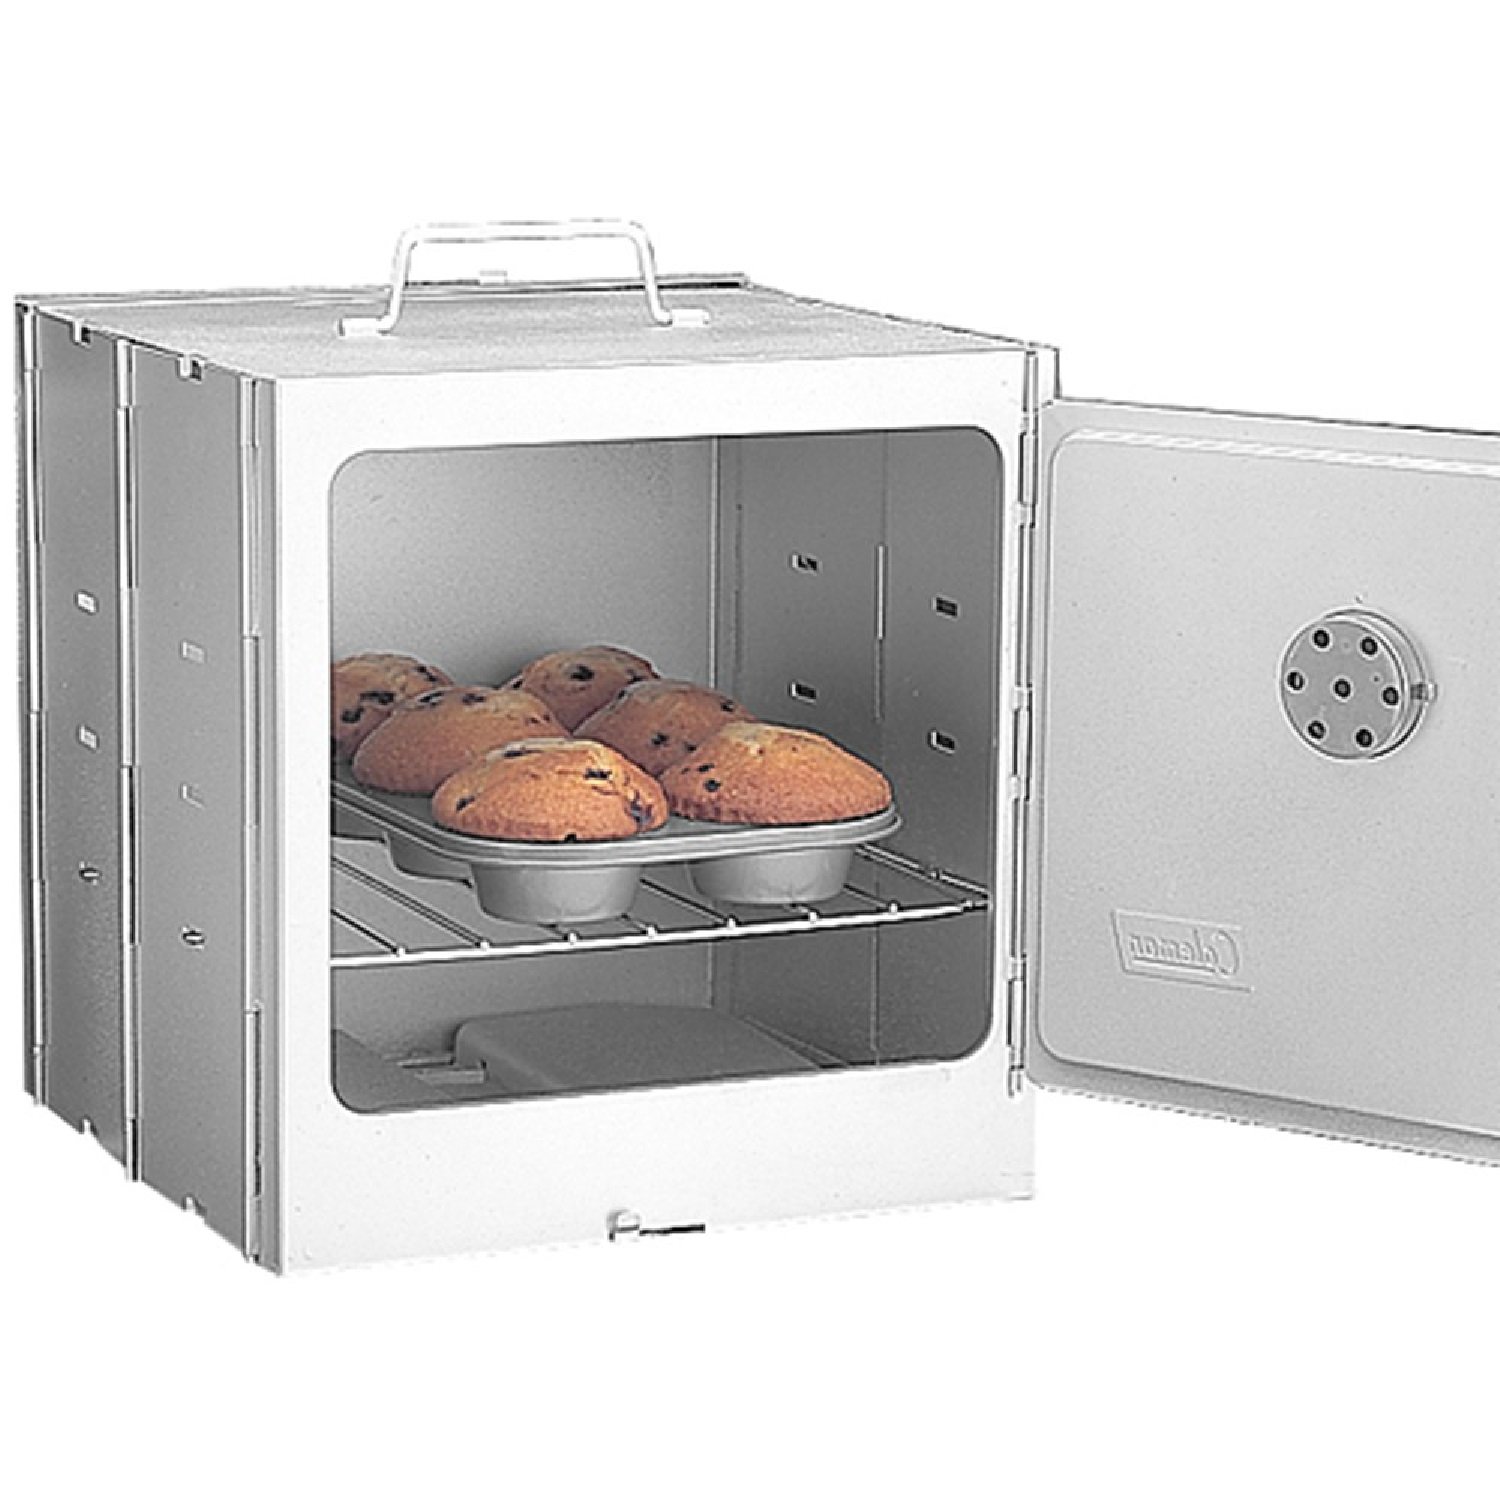
I don't know about you, But I LOVE Pizza. Particularly ham, pineapple, red onion, and bell pepper. If I can add sun dried tomatoes all the better! But that tends to be heavy in carbs and fat. So I worked up a recipe that is hard to beat that can be done in a Coleman camp oven. (I'd love to do the cauliflower crust but the camp oven doesn't get hot enough...).
What equipment will you need?
If you don't already have the gear, here are some links for the major pieces of gear. Purchasing from Amazon through our links helps support our efforts. We really appreciate it.
The camp stove we use mostly is our Coleman 424 Dual Fuel. It is far more fuel efficient than a propane stove and shares a common fuel with our vehicles (regular unleaded gasoline).
The Coleman Camp oven is a great, easily collapsible piece of equipment that makes low carb / paleo cooking in camp MUCH more like cooking at home.
All that extra excersize doesn't mean you can eat whatever you want and still expect to lose weight. I know, I tried that route. It doesn't work.
So with the advice of my doctor, and nutritionist, and mind you I am NOT offering up medical advice, just telling you what is working for me.
I don't know about you, But I LOVE Pizza. Particularly ham, pineapple, red onion, and bell pepper. If I can add sun dried tomatoes all the better! But that tends to be heavy in carbs and fat. So I worked up a recipe that is hard to beat that can be done in a Coleman camp oven. (I'd love to do the cauliflower crust but the camp oven doesn't get hot enough...).
What equipment will you need?
- Dual burner camp stove. I use a Coleman 424 Dual fuel.
- Fuel for your stove. If using liquid fuel a funnel / filter for that fuel as well. If using propane, make sure your stove is compatible with your fuel source. I.E. the Brinkmann 2 burner stainless steel camp stove will be overpressured and damaged bu connecting to a 20lb cylinder. Use only the green small cylinders.
- Coleman Camp Oven. There are others, I use the Coleman because, well I have it, and like the way it works.
- Aluminum Foil.
- Hot pad for removing / adding to the oven.
- Mixing bowl.
- Cutlery, serviceware etc...
You will need the following ingredients.(We prefer organics, make your own choices) Prep ahead of time unless you are long term camping such as Full time nomads, and long hunting trips.
- Whole wheat tortillas
- Canned tomato sauce. 8oz
- Garlic powder
- Italian Seasoning.
- 1/2 cup of 50/50 mix of 2% shredded Mozerella 2% shredded medium cheddar.
- Toppings of your choice.We use...
- Italian sausage crumbles pre cooked.
- Sun Dried tomatoes
- Red Onion slices
- Bell Pepper slices
- chunk pineapple
- sliced cooked ham or better yet, Canadian Bacon if you can get it.
Pre heat and stabilize your stove / and oven to 350 degrees F. Place your rack in the middle position. If you are lucky enough to have 2 racks, place one middle, 1 top.
Pour tomato sauce into mixing bowl. Add 1 tbsp Italian Seasoning, and a pinch of garlic powder. Mix thoroughly.
Tear off a piece of aluminum foil sized to the rack of your oven. Do not block the airflow all the way though. Allow about 1" from the sides.
Place tortilla on the foil, spread your tomato / pizza sauce like a regular pizza, and add a thin layer of cheese. Add your toppings, and another layer of cheese.
The sandwich of melted cheese when you are done helps keep the toppings from falling off.
Place your pizza(s) in the oven and cook for 15-20 minutes until the cheese is thoroughly melted and the toppings are hot.
Repeat as your dietary requirements see fit.
Serve with a Cesar salad.
If you don't already have the gear, here are some links for the major pieces of gear. Purchasing from Amazon through our links helps support our efforts. We really appreciate it.
The camp stove we use mostly is our Coleman 424 Dual Fuel. It is far more fuel efficient than a propane stove and shares a common fuel with our vehicles (regular unleaded gasoline).
Subscribe to:
Posts (Atom)