Friday, February 24, 2017

Camping considerations for the heavy / obese camper, gear for the coffee lover.

Part of the reason behind our working this Wildersport Outdoors thing, is to use our love for the outdoors and outdoor adventures to get out, and get more active. Basically sneak in workouts without them being drudgery. And we have found in past experience, when we go camping, our diet improves greatly, and our activity level goes way up.

We both love camping, however as larger people, we have some issues with regular camping gear that cause certain concerns / considerations.

Any of you that have shared an airbed with your sleeping partner knows what happens when one of you rolls over, or gets out of bed, and it isn't pretty. So we wanted separate beds that we could scoot together in a sort of makeshift amber king bed. So we went and grabbed a pair of Intex 18" raised twin air beds. Unfortunately one of us is over the 300lb weight rating on the bed. Now the queen size of this same bed is weight rated at 600lbs, and the materials and methods seem to be identical aside from the scale of the mattress itself. So honestly, we are going to wing it.

I am planning on packing the Therm A Rest camp rests with us, in case my air bed fails due to my weight, and hoping praying for the best.

Sleeping bags obviously can be a consideration. Coleman, Slumberjack, and others make King size sleeping bags, the extra room is well worth the extra money. There are so many options and temp ratings I can't really link here.

The Therm A Rest Camp rest self inflating pads we have are over 25 years old, and out of production now. Once we find a suitable replacement I will link them here for your convenience.

We do have an option that would take more packing space, and space in the tent, but we do have Stansport BigXL cots, and with the Therm A Rest they are actually decent to sleep on. Stansport no longer manufactures this model, but it looks like Teton sports makes a similar cot that I will link below.

Honestly I am hoping the airbed will hold up to my weight. 

Second issue is probably related, but I don't function well without coffee. Years ago, we bought a Coleman stove top drip coffee maker, which I love, but am always scared to take camping with me because of the glass carafe. Well, while perusing Coleman for parts and accessories, and double checking on Amazon, we found the Coleman Quick Pot Stainless Steel carafe. Basically a direct replacement carafe but in stainless steel instead of glass. SOLD! No chance ever of it breaking.

Now I know, I can use a percolator, and I do own a stainless steel Texport percolator. But have you ever tasted percolator brewed coffee? While it is certainly better than instant, it is far below my standards.

And the last upgrade / replacement we are going for in regards to camping gear is coffee related again. I have gotten a big taste for Hot mochas and cappuccino, Meaning coffee, sweetener, and frothed milk. Sadly our milk frother at home is glass, and VERY fragile glass at that. So instead we are going to go with a Stainless Steel, or Acrylic frother. I typically don't like anything plastic touching foods or drinks if they get hot, but in the case of the frother, the milk stays cold....

So with this stuff in the inventory, and ready to go, it is time to dig down the rest of the gear, I have a park in mind to camp at, with full, nice bathrooms, water, and power as well as a covered picnic table at the sites. So with that knowledge safely tucked away, time to sort out my lists, sort out the gear, and pack accordingly... 

Soon you will see some video from the trip we are prepping for, and will get video reviews of the gear in question. But until then... Get out there and find your own... road less traveled.

Monday, January 30, 2017

Setting up your camp kitchen, part 1.

To make your meals, you will want to set up a camp kitchen. Assuming you want to eat something more than reconstituted freeze dried backpacking meals and instant oatmeal, or hot dogs and marshmallows cooked on a stick over a fire, this will take a bit of equipment. We will lay out what we use, what is optional,a nd what is a real msut have. What can be substituted if possible.


  1. Camp Kitchen. We use the Coleman Pack-A-Way camp kitchen. It is smaller and lighter than several of its competitors, lacking a few of the luxuries the others offer in favor of a more manageable package. If you can rely on say the tailgate of a pickup, or wherever you are camping having a picnic table you can use, you can omit the camp kitchen and use something like the Coleman Stove Utensil rack.


  2. You will need a washbasin to keep things clean. The Coleman collapsible double wash basin is rugged for plenty of camping trips, and roomy enough to allow you to have a soapy water wash and a rinse basin. They are available in packs just alone or with a nice 4 place enamelware place setting set. (You will of course need dishware right?)


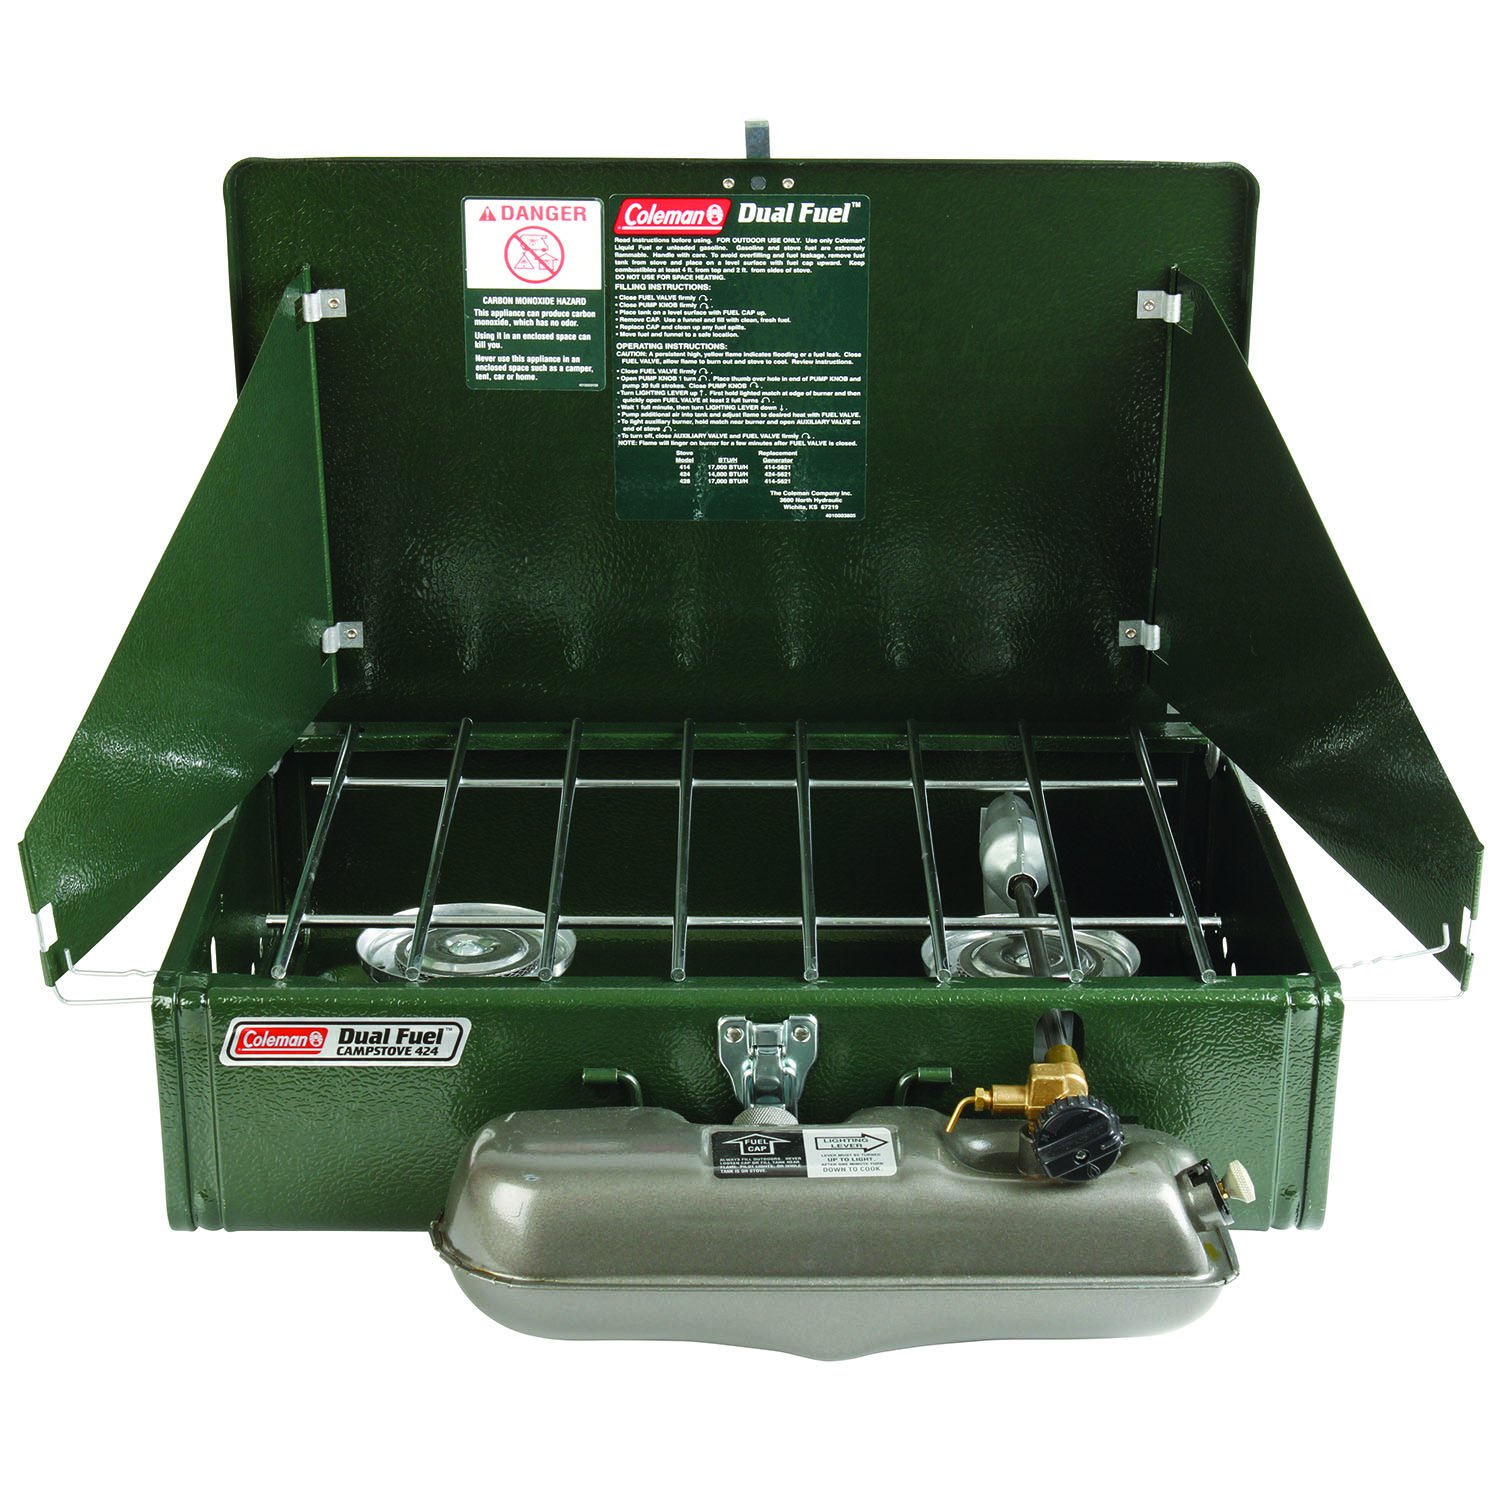
  3. Of course a camp stove is a must have piece of equipment for your trips. We personally prefer liquid fuel stoves. Specifically the dual fuel stoves. We love the ability to run our stove on the same fuel as our vehicles use. The Coleman 424 Dual Fuel 2 burner camp stove. It uses either Coleman White gas / Ozark Trail Camp Fuel, or unleaded gasoline. Aside from the common fuel, liquid fuels, specifically the White Gas, well a gallon of white gas, or unleaded gasoline has the total full on burn time of 4.5 to 5 of those green 1LB propane cylinders. Make no mistake, a 1LB propane cylinder when used up is still considered hazardous waste, And the cost difference over the long run, a liquid fuel stove pays for itself easily Combine that was the fact that liquid fuels will pressurize and work in conditions that a propane stove simply can  not like sub freezing conditions. Something to consider if you are using your stove for winter hunting trips.


  4. You will of course want cookware. There are a couple of schools of thought to this. Stainless Steel sets with copper bottoms are durable and work well. We have one, an Ozark Trail set that is just a rebadged TexSport, it works great, but has problems with heating evenly. If you want even heating, the only real way to accomplish that is with cast iron cookware. I highly recommend if you are going to buy new cast iron cookware, that you buy non seasoned cookwae. Doing so will teach you how to properly maintain cast iron. You will want a dutch oven, a skillet / fry pan, and a sauce pan. A lid lifter is a life saver as well. A very much optional item, but highly recommended is a griddle. And take our word for it, you want cast iron on that. The reasons are that you can cook LOTS of pancakes, eggs and bacon on a griddle super easy. We love ours.


  5. Food storage is critical for any sort of home cooking while camping. A quality cooler is a must. Now most of us can't really afford the Yeti type coolers, And the physical size of them compared to the actual storage capacity, they really aren't at least to us, all that appealing. We have found for long weekend camping, a 50 - 60 quart cooler is ideal. The trick is to get one of those "5 day" coolers that will keep block ice, well, ice for 5 days. There are 2 that are our favorites. The Colmean Extreme 50 quart wheeled cooler, and the Igloo MaxCold Roller Cooler 60QT. The main difference, aside from the 10QT diference in capacity, is the physical format, The coleman is more cube shaped, and the wheels are along the "wide side", it rolls much like a suitcase. The Igloo we favor though. It holds ice a little bit better, rolls easier, and the handle is easier to deal with where it is just a simple swing up handle. With either, we simply take empty 1L plastic water bottles, press a little bit of air / water out so that the sides are slightly sucked in and then freeze them solid. We usually use 10 of them. Simply toss them in when you load the cooler, and you are good to go. No soaking wet of the ice on your food containers! I won't provide links, but food storage containers, the plastic or glass ones with air tight lids Square ones use space much better than round ones. Keep everything air, and liquid tight!


  6. Cutting board, and knives. Another no links. Pick your favorites, just make sure that your knives are kept in a knife roll so that they transport and sstore safely.
There's more to come, but this is going to be a long read. Stick with us and enjoy the list!

Friday, January 27, 2017

Cooking well. Low carb pizzas in camp.

So you are camping enthusiasts like us that need to lose weight. You know getting out in the back country gets you active up and around in beautiful surroundings to the point you are getting a workout in without even noticing it.

All that extra excersize doesn't mean you can eat whatever you want and still expect to lose weight. I know, I tried that route. It doesn't work.

So with the advice of my doctor, and nutritionist, and mind you I am NOT offering up medical advice, just telling you what is working for me.

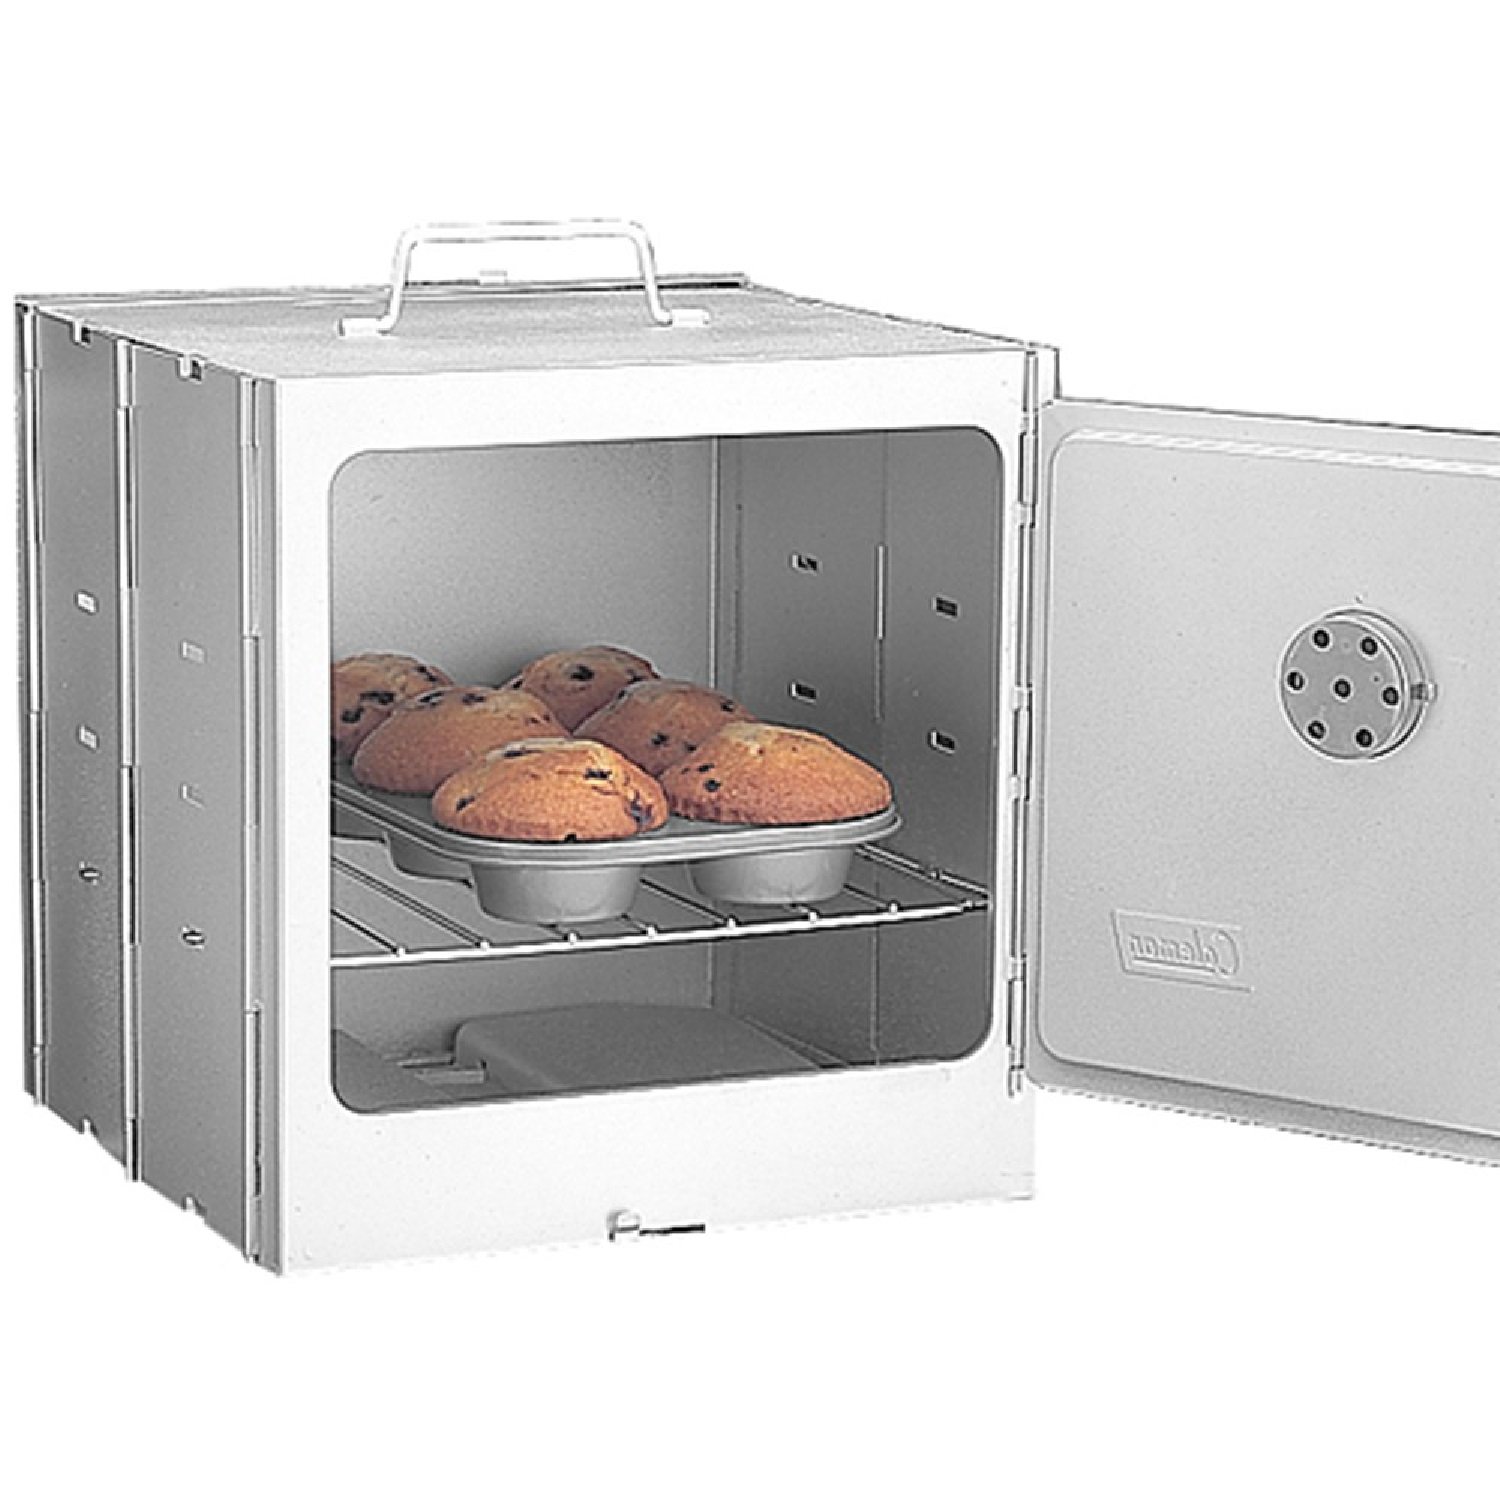
I don't know about you, But I LOVE Pizza. Particularly ham, pineapple, red onion, and bell pepper. If I can add sun dried tomatoes all the better! But that tends to be heavy in carbs and fat. So I worked up a recipe that is hard to beat that can be done in a Coleman camp oven. (I'd love to do the cauliflower crust but the camp oven doesn't get hot enough...).

What equipment will you need?


  1. Dual burner camp stove. I use a Coleman 424 Dual fuel.
  2. Fuel for your stove. If using liquid fuel a funnel / filter for that fuel as well. If using propane, make sure your stove is compatible with your fuel source. I.E. the Brinkmann 2 burner stainless steel camp stove will be overpressured and damaged bu connecting to a 20lb cylinder. Use only the green small cylinders.
  3. Coleman Camp Oven. There are others, I use the Coleman because, well I have it, and like the way it works.
  4. Aluminum Foil.
  5. Hot pad for removing / adding to the oven.
  6. Mixing bowl.
  7. Cutlery, serviceware etc...
You will need the following ingredients.(We prefer organics, make your own choices) Prep ahead of time unless you are long term camping such as Full time nomads, and long hunting trips. 
  1. Whole wheat tortillas
  2. Canned tomato sauce. 8oz
  3. Garlic powder
  4. Italian Seasoning.
  5. 1/2 cup of 50/50 mix of 2% shredded Mozerella 2% shredded medium cheddar.
  6. Toppings of your choice.We use...
    1. Italian sausage crumbles pre cooked.
    2. Sun Dried tomatoes
    3. Red Onion slices
    4. Bell Pepper slices
    5. chunk pineapple
    6. sliced cooked ham or better yet, Canadian Bacon if you can get it.
Pre heat and stabilize your stove / and oven to 350 degrees F. Place your rack in the middle position. If you are lucky enough to have 2 racks, place one middle, 1 top.

Pour tomato sauce into mixing bowl. Add 1 tbsp Italian Seasoning, and a pinch of garlic powder. Mix thoroughly.

Tear off a piece of aluminum foil sized to the rack of your oven. Do not block the airflow all the way though. Allow about 1" from the sides. 

Place tortilla on the foil, spread your tomato / pizza sauce like a regular pizza, and add a thin layer of cheese. Add your toppings, and another layer of cheese. 

The sandwich of melted cheese when you are done helps keep the toppings from falling off.

Place your pizza(s) in the oven and cook for 15-20 minutes until the cheese is thoroughly melted and the toppings are hot.

Repeat as your dietary requirements see fit.

Serve with a Cesar salad. 

If you don't already have the gear, here are some links for the major pieces of gear. Purchasing from Amazon through our links helps support our efforts. We  really appreciate it.

The camp stove we use mostly is our Coleman 424 Dual Fuel. It is far more fuel efficient than a propane stove and shares a common fuel with our vehicles (regular unleaded gasoline).
The Coleman Camp oven is a great, easily collapsible piece of equipment that makes low carb / paleo cooking in camp MUCH more like cooking at home.

Tuesday, September 6, 2016

It's been a while...

It has been far too long since we have added a blog entry for Wildersport Outdoors, and there is a LOT of good reason for that...

Since I believe it was May this year that our last entry was put in, we have been diving into videography, heavily as we feel that a video blog, or VLOG would be far more engaging than a simple text and photo blog, so we have been going out, taking tons of videos, trying out new equipment, and breaking same said equipment. Some things that we have figured out...

#1. I don't quite know how to not fly a drone into a tree yet. Getting there, and I just finished replacing the drone body and testing it. Thank God for serviceable drones. Replacement parts, and ease of service are 2 of the main reasons we opted for the Horizon Hobby Blade Chroma camera drone, that, and proven compatibility with the SJCam SJ4000 WiFi. I know GoPro is the big name in action cams, but I REALLY like my SJ4000...

#2. Gimbals which are a sort of motorized camera stabilizer, are well worth the money if you can grab one... Thank you Eric Jacobs, A.K.A. the Nomadic Fanatic for the idea, and recommendation on Gimbals. Admittedly ours is the model that replaced his, but so far, no complaints, at least not since flashing the firmware that is!

#3. Having Elderly members of your household, with 2 legs, or 4, means you tend to stay close to home. We have been discovering things about Houston Metro area that we otherwise never would have seen, and we can't wait to bring it to you.

#4. A good number of video editing applications do NOT like AMD / ATI video drivers. We have tried Corel, Adobe, and CyberLink, CyberLink's PowerDirector is giving us the LEAST problems, but is still full of performance issues. Our next laptops are going to have to be Intel withthe  NVidia graphics... That is going to hurt.

#5. Trying to capture video of public places, on major holiday weekends is a fools errand. Just don't even bother. Galveston Island Seawall? Forget it, bumper to bumper traffic and more people than grains of sand it would seem. San Jacinto Monument wasn't any better....

#6. What I thought was a scratch in a waterproof body lens isn't, it is a machining mark. I need to call and get a replacement while I am under warranty.

For what it's worth, I found a good couple of videos on Youtube on how to replace a busted airframe on a Chroma camera drone, neither of which gave me 100% of the information I needed, but given both videos I was able to figure out how to repair the hardware, sadly, calibrating the compass and GPS takes a LOT more info than anything posted.

You see the problem is that the Chroma camera drone comes in a LOT of variants, different transmitters, cameras, or not, gimbal, or not, etc... Our unit is the Chroma with Go Pro ready Gimbal and Spektrum DX-4e transmitter. The manuals for this particular model are lacking in useful info on this. I had to engage Horizon Hobby tech support, which I wanted to mention a couple of things.

#1. Getting a hold of a human at Horizon Hobby isn't easy. BUT they do have a call back service so you aren't waiting for hours burning your airtime on a mobile phone trying to get in touch with someone...
#2. Once you get a hold of a human, they are VERY helpful.

Working with Horizon Hobby support, we found that the manual for the model without a gimbal at all had the info we needed in its manual. So we got that solved.

The remaining issue I have with the Drone is gimbal tilt control.

For now, until I learn what I am doing, and can pass the FAA UAV test, I am going to leave the drone video out of my paid videos, and keep it registered as a hobby drone. I am hoping to change this status before years end...

There is a lot of footage in the queue being processed, and a good deal for you to enjoy, from the mansions of Galveston Island, to the U.S.S. Texas, and San Jacinto Monument just outside of Houston Texas.

As we go along we are working to branch further and further out for you.

So stay tuned, and enjoy what we have to offer!

Tuesday, March 8, 2016

A trip down Texas back roads to find our Blessing....

A day spent with family can although not always is, be a real blessing. And in the case of our weekend country drive with extended family we decided to go and find some Blessing... Blessing Texas that is....

Yep, we found a town on the map with a cute name, and decided since it was close enough to see just what it was all about...

Well, for starters, there will be a video coming, I am slow in processing since my video software is having a conniption fit, and since Extended family in question didn't have a whole lot of sympathy with the whole shooting video for a Vlog, well... I am going to have to do some narration at home in the studio. Weather in League City right now is flatly violent, and any recording I did would sound terrible... But back to the Blessing.

We loaded up the car with myself, my wife, my one of my brothers in law and his wife and we headed out. Making sure to stock up on all the quality healthy road trip snacks, or okay so we slipped off the diet band wagon pretty hard, but Funions are REALLY hard to say no to!

We had the destination of Blessing in mind as it has been one of those that we kept hearing about.... Now typically when I hear repeatedly about a destination, there is usually something worth seeing there, and while Blessing really isn't a whole lot more than a wide spot along the highway, there was a certain charm along what little main drag it had, particularly the Hotel Blessing.

The Hotel Blessing is both charming in its just post turn of the 20th century charm, and with its drab gray exterior, and over a century of wear and an obvious lack of maintenance and upkeep budget,combined with a bit of a cross between Victorian elegance and frontier rustic simplicity of styling, well it had the look of a horror film set for any variety of B movies.

The hotel staff was friendly and answered a good deal of questions about the hotel, and while there was a very distinct lack of modernity, there is certainly the vibe of an old building well connected with Texas history. And for a wooden structure over a century old as close to the coast as this place is, it is miraculous that it still exists period...

The town, what little of it we saw, and perhaps there just wasn't that much to begin with, only a block or two each way off of the highway, and perhaps 2 miles long at most, seemed to be neatly kept, and had a certain charm to it that can only be found in the country. A fact that was made abundantly clear to us as we got caught on the highway, behind a small convoy of rumbling green and yellow behemoths otherwise known as John Deere combines . I guess we should have asked what sort of crops the folks over there grow!

If you are ambling over through Texas State Highway 35, in Matagorda County heading toward the coast, you might just want to stop on in and see what Blessing Texas is all about, you can be sure we will be back to do the driving tour of Blessing, and catch you all up on the history of this unique little town!

Monday, April 13, 2015

A day enjoying the history on display on Galveston Island Texas. Seawolf Park.https://lh4.googleusercontent.com/-ymA8VyjlinA/VSBMIT8d1YI/AAAAAAAAIDM/IrvkPCjZpm0/w1518-h854-no/20150404_151942.jpghttps://lh6.googleusercontent.com/-CL3XLsg9sts/VSBMR3Fm-ZI/AAAAAAAAIDw/wjokBZjIDsg/w1518-h854-no/20150404_152127.jpghttps://lh6.googleusercontent.com/-Z21oauuO9ec/VSBM6Bmfa_I/AAAAAAAAIGQ/t4maqcEMn4U/w1518-h854-no/20150404_153042.jpg

With the "Greatest Generation" that saw the world through the darkest hours of World War 2 and ushered in the modern era slipping away rapidly, it's a great thing that we have museums, and countless books, documentaries and other means to remind the world to never go back down that dark and sorrowful road...

One such spot where visitors can get actually hands on with real honest to goodness World War 2 military hardware is at Seawolf Park in Galveston Texas. 

Seawolf Park, featuring the American Undersea Warfare Center is located technically just north of Galveston, on Pelican Island, and is a memorial to the United States Navy Sargo-class submarine USS Seawolf (SS-197) mistakenly sunk by U.S. Navy forces in 1944 during World War II.

Seawolf park features a submarine, and the remains of a merchant ship, and a destroyer escort designed to conduct antisubmarine warfare all in one museum area. It is the home of two semi preserved U.S. Navy ships, the first as you enter the display area is the Gato-class submarine USS Cavalla (SS-244) and immeidately across the display area, the Edsall-class destroyer escort USS Stewart (DE-238), and the remains of the World War I tanker S.S. Selma, the largest concrete ship constructed, can be seen in the waters northwest of the park '​s fishing pier. Also displayed at the park is the tower of the Balao-class submarine USS Carp (SS-338) and the sail of the Sturgeon-class nuclear attack submarine USS Tautog (SSN-639).

There are facilities for having a picnic, and shore access inside, and out of the park where anglers can fish for common Texas Coastal fish such as Sea Trout, Speckled Trout, Atlantic Drum, Flounder, Gafftopsail Catfish and others. 

A tour through the park, and the naval installations can give the visitor a great understanding of the hardships the Greatest Generation had to go through, lacking in even the most basic modern conveniences and comforts. 

We recently took the trip to Seawolf Park, hopefully this photo tour will give you a feel for what things aboard were like for those that put their lives on the line for liberty...


The road in from the main island leads through Palm trees and sand until it all opens up to a view of a World War 2 era Destroyer escort ship. Quite a sight for sure!


The sign at the entrance gate gives a clue that this isn't your ordinary county park!


As you come through the ticket takers station, the first thing you are greeted by is the business end of a U.S. Navy Submarine, complete withe torpedo being fired, and frozen in time.


As you round the nose of the submarine, and walk between vessels, a beautiful sandstone and cast I believe it is bronze monument stands to honor the fallen.


Words far too many many have come to forget the true meaning of. 

Now we climb aboard the USS Cavala and take a tour aboard a real World War II submarine!


The decking of the Cavala was refurbished since 2000, but already is showing the impact of the harsh marine environment.

As you descend the stairs through the hatch, you immediately enter into the forward torpedo room. 


Thanks to the handy tour signage, we now now how torpedoes were propelled in World War II.

Moving on, let's let the photos do the talking, they say it so much better than I can!


Remember that sign about the Officers Staterooms? Well here they are!


You'd think Officers would have had better quarters, but then again, this isn't meant to be a luxury cruise ship!


Some of the areas of the exhibits, it is obvious that more modern equipment has been installed.


Now this next pic, shows just how much decay happens over 71 years, including a good number of those years, 1944 to 1971 being maintained in active service.... I'm no expert, but I suspect there is a LARGE number of missing valve handles here!


Somehow I doubt the poster in the Crews Mess is original to the sub from 1944.


And that is it for the sub pics for now... In order to keep in manageable, I am going to break this up into pieces that are easier to chew on as it were, so for now...

Get out there and find your own... road less traveled.
Wednesday, March 11, 2015

An Introduction to Tents part 1. Size matters. Big Tents.

So it's springtime in Texas, that means 2 big things to most of our outdoor enthusiasts. Camping, and rain...

It would appear that God had something interesting in mind for outdoorsy folks in the spring when he made Texas. At the time of year the weather is not too cold, but cool enough to sleep in a tent, he threw lots and lots of rain our way just to make things entertaining....

Now there's nothing I like more than to be snuggled up with my wife listening to the rain hitting a taut waterproof rainfly. And there is nothing I hate more than being awakened at 3 A.M. in a torrential downpour only to find a river running through my tent, and the rainfly seam directly over my head leaking a steady stream of water onto my sleeping bag and saturating it and me....

So how do we manage to stay dry and warm when camping in the sog?

It all starts out with proper tent selection...

Let's start off talking about tent sizes.... Now I totally get it that you might want a nice roomy tent to move around in, have a dedicated area to get dressed in instead of trying to slide your pants on while wrestling against an airbed. But let's keep things in perspective. A couple probably doesn't need to be pitching a 10x20 tent for a couple of reasons.

#1. The larger the tent, the more the seams.
#2. The larger the tent, the more the zippers.
#3. The larger the tent, the more the tent is susceptible to the wind, and falling / blowing stuff that can punch holes in it.
#4. And lastly, the larger the tent, the more interior volume you have to either keep warm, or cool... Both are terribly challenging with greater interior volumes.

BUT, there are features found on larger tents that you may find highly desireable such as.

#1. Power Ports. If you camp where power is available, many family tents, and even some cheap models have Power Ports. This allows you to bring in outlets for things like chargers, small fans, or even a small space heater (Be extra, extra, extra careful with those!)  We have a Coleman Sundome 10x10 from about 2004 or 2005 that includes that feature. Very nice to have! We have a GFCI outlet strip that we plug a small portable fan into. We keep a small cooler that is just a spare, that holds a block of ice. We simply open the lid and have the fan blow across the ice. Keeps the test super cold through the night...

#2. Eyebrow windows. These offer the opportunity to have some fresh air flowing through your tent without fresh water falling though the screen, and the downward slope of the window affords you at least a small measure of privacy against those strolling by your tent.

#3. Partitioned spaces / rooms. This is great to allow mom and dad at least a tiny bit of privacy from the kids, or a couple of hunting buddies privacy from each other when it's time to hit the rack... The most popular reason to have a larger tent is in fact to keep families together instead of shoving the kids off in a tent on their own. This can easy many an anxious parent, or child until the child hits their teens and decides, that "Share a tent with mom and dad? Ewwww!"

#4. Higher center ceiling heights making it easier for taller adults to stand up, get dressed etc... in one.

#5. Typically lower cost as more expensive lightweight materials aren't used very often in larger / family sized tents. Not too many aluminum or titanium poles to be found here! Just shock corded fiberglass.

#6. Rugged, easily patchable, and nearly water resistant tub floors. These are typically made of the same stuff that heavy nylon / vinyl tarpaulins are made of. The floors do a great job of keeping water out, unless it is already in, where they do a great job of keeping the water IN.. Not by design of course, but you get the idea...

So you see there is a lot to be fond of in larger tents. Their upsides, depending on the application however, can be a real deal killer in other applications. Nobody is taking a large say Canvas cabin tent backpacking any time soon unless they are training for an ironman competition.  And many older, smaller camp sites just don't have tent pads large enough to pitch a big old tent...

So it's crucially important to keep your party size, level of comfort, and budget in mind when selecting a tent.

Once you are set up, take the next available opportuinty to...

Get out there, and find your own, road less travelled.